How to Edit: Currencies, Finances, Suppliers, Logistics
Important Notes:
- The user can edit currencies in the order in all fields where amounts are specified.
- The user can fix exchange rates in the order.
- All products in the order can be in different currencies.
- All calculated/virtual fields are considered in the OMS currency at the rates saved in the order.
Note: Editing sections of the section is available to users with the access role: OMS Admin.
How to Fix Exchange Rates in the Order
- Go to the order editing page.
- On the right side of the workspace, click , then click Currency Settings. In the Currency Settings window, with the Currencies of this order switch turned on, the currencies of the order and their rates obtained via the bank API relative to the US dollar rate are displayed. To view all available currencies, turn off the Currencies of this order switch.
- Select the desired currency from the list and enter the adjusted exchange rate, then click Save.
Upon successful saving of the rate, the amounts in the order's calculated currency will be updated automatically.
Order Currencies
When working with orders, users work with multiple currencies:
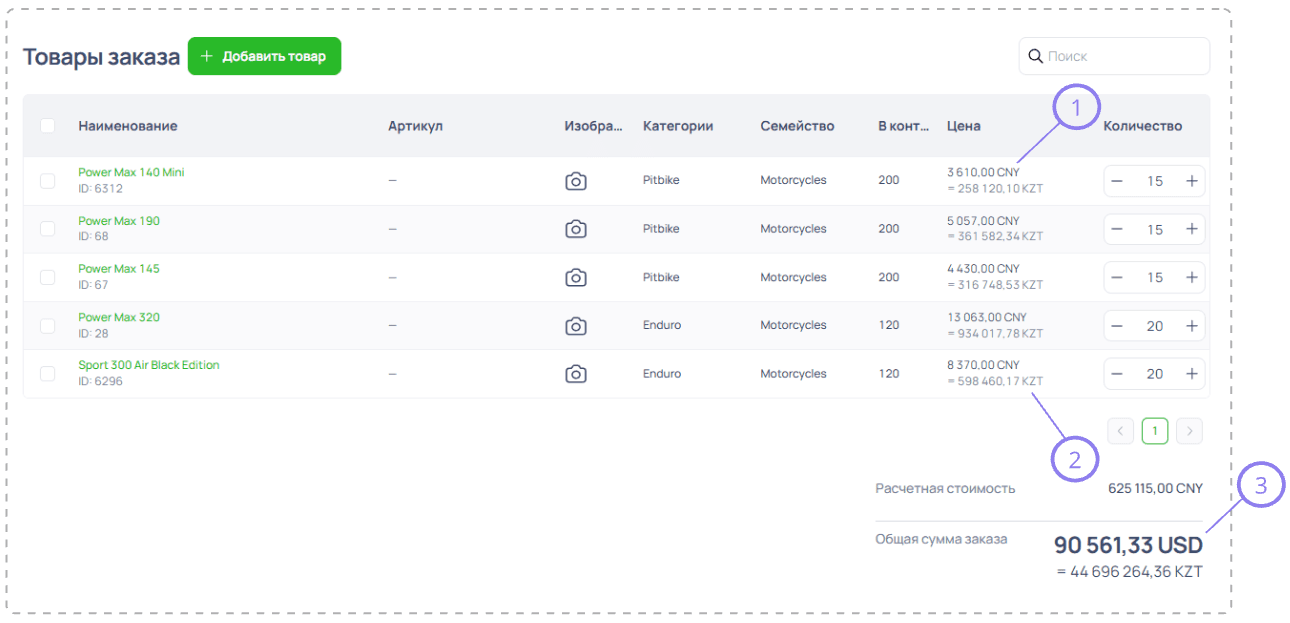
- Dealer price currency of the product for the corresponding region or regional currency of the dealer price of the product.
Note: Set in the PIM settings by a user with the access role of OMS Admin or tenant administrator.
- Regional currency of the tenant.
Note: Set in the tenant settings by a user with the access role of tenant administrator.
- Calculation currency in orders.
Note: By default, it is set in the tenant settings by a user with the access role of tenant administrator. It can be changed in the order by a user with the access role of OMS Admin.

How to Edit Order Finances
- Go to the order editing page, then find the Finances section.
Note: The order editing page is available to users with the access role: OMS Admin.
-
The Order Payment Status is set by the system and can have values:
Requires Payment,Prepaid, andPaid. The current payment status of the order depends on the funds deposited for the order:Requires Payment: no funds have been deposited for the order or the deposited funds are insufficient for the current status to change to a new payment status;Prepaid: the actual amount deposited is equal to or greater than the prepaid amount:Actual Amount (order payment) > or = Planned Amount (order prepayment)Paid: the actual amount deposited is equal to or greater than the total amount of the order:Actual Amount (order payment) > or = Total Amount of the Order
Information on payments made is saved in the order at the moment the user saves the data. Payment history is not saved in the order: For example, if you export the order after saving the latest finances in the order, the export file will contain data on the deposited amount at the time of the last saved changes.
-
The Total Amount of the Order is the amount that needs to be paid for the order for the payment status to change to:
Paid. The total amount of the order is displayed at the end of the Order Items section (in multiple currencies) and in the Finances section. To edit the currency in the Finances section, select the desired currency in the dropdown next to the order amount, then click Save. Upon successful editing of the order currency, the total amount of the order will be recalculated in the new currency in the Order Items and Finances sections.
-
The Planned Amount field (order payment, order prepayment):
Note: See the logic of changing order payment statuses in item 1.a.
- To edit the current value of the planned amount, enter a new amount, then click Save.
- To edit the currency value, click on the dropdown and start typing the name of the desired currency, then select the desired currency and click Save.
Note: When selecting a new currency, the amount in the corresponding field is not automatically recalculated.
- The Actual Amount field (order payment, order prepayment):
Note: See the logic of changing order payment statuses in item 1.a.
- To edit the current value of the actual amount, enter a new amount, then click Save.
- If necessary, edit the currency value by clicking on the dropdown and starting to type the name of the desired currency, then select the desired currency and click Save.
Note: When selecting a new currency, the amount in the corresponding field is not automatically recalculated.
- The Payment Deadline field (order payment, order prepayment): to edit, click on the field, set the desired date, then click Save.
- The Bank field: to edit the recipient bank, click on the field and select a bank from the suggested list, then click Save.
Upon successful saving of any of the above fields in the Finances section, a message Order Updated will be displayed in the portal workspace, and the value of the corresponding field will be updated.
How to Edit Order Suppliers
Go to the order editing page, then find the Supplier section:
Note: The order editing page is available to users with the access role: OMS Admin.
- The Supplier Warehouse selection field:
- to view available supplier warehouses, click on the Supplier Warehouse field, the available warehouses will be displayed in a dropdown list. To collapse the list, click on the Supplier Warehouses field again.
- to select a new warehouse, click on the Supplier Warehouse field and start typing the name of the warehouse in the search field, then click on the found warehouse or select the desired warehouse from the suggested list.
- The New Contract option: if a new contract is required for the supplier, check the option; if a new contract is not needed, leave the checkbox empty.
- The Markup section:
- The Planned Amount input field: enter the expected markup amount, if necessary, edit the currency value by clicking on the dropdown and starting to type the name of the desired currency, then select the desired currency.
Note: When selecting a new currency, the amount in the corresponding field is not automatically recalculated.
- The Actual Amount input field: enter the actual markup amount, if necessary, edit the currency value by clicking on the dropdown and starting to type the name of the desired currency, then select the desired currency.
Note: When selecting a new currency, the amount in the corresponding field is not automatically recalculated.
-
The Payment to Supplier section:
- The Planned Amount field is calculated automatically; if necessary, edit the currency value by clicking on the dropdown and starting to type the name of the desired currency, then select the desired currency.
Note: When selecting a new currency, the amount in the corresponding field is recalculated automatically.
- The Actual Amount field is calculated automatically; if necessary, edit the currency value by clicking on the dropdown and starting to type the name of the desired currency, then select the desired currency.
Note: When selecting a new currency, the amount in the corresponding field is recalculated automatically.
The overall formula: Payment to Supplier = Total Amount of Order - Markup.
5. Saving Changes: after filling in all the data, click Save at the bottom of the form. Data can be entered in any order and partially, but changes take effect only after clicking the Save button.
Upon successful saving of any of the above fields in the Supplier section, a message Order Updated will be displayed in the portal workspace, and the value of the corresponding field will be updated.
Important Notes:
- All amounts must be specified in numeric format: for example,
100.5. - Carefully check the currency before saving to avoid calculation errors.
- Changes take effect only after clicking the Save button.
How to Edit Order Logistics
Step 1. Select Route
- Find the "Route" field with the hint "Select Route".
- Click the arrow on the right side of the field to open the dropdown list of routes.
- Select the desired route from the list.
Step 2. Select Importer
- Go to the "Importer" field with the hint "Select Importer".
- Click the arrow on the right side of the field to open the list of importers.
- Select the necessary importer from the suggested list.
Step 3. Specify Booking Date
- In the "Booking Date" field (format: DD.MM.YYYY), click inside the field.
- Delete the old date, if any, using the Delete or Backspace keys.
- Enter the new booking date in the required format (for example, 15.03.2023).
- You can also use the calendar (icon with a calendar image on the right side of the field) to select a date.
Step 4. Fill in the "Customs Clearance" Section
- Cost:
- click in the "Enter Amount" field for customs clearance;
- enter the amount in numeric format (for example, 1234.50);
- make sure that USD is selected in the dropdown (if another currency is required — click the arrow and select the desired one).
- Payment Date:
- click in the "Payment Date" field (format: DD.MM.YYYY);
- delete the old date and enter a new one or use the calendar (icon on the right side of the field).
Step 5. Fill in the "Transport" Section
- Cost:
- click in the "Enter Amount" field for transport;
- enter the amount in numeric format;
- check that USD is specified in the dropdown (change the currency if necessary).
- Payment Date:
- click in the "Payment Date" field (format: DD.MM.YYYY);
- delete the old date and enter a new one or use the calendar (icon on the right side of the field).
Step 6. Fill in the "Broker" Section
- Cost:
- click in the "Enter Amount" field for the broker;
- enter the amount in numeric format;
- make sure that USD is specified in the dropdown (change the currency if necessary).
- Payment Date:
- click in the "Payment Date" field (format: DD.MM.YYYY);
- delete the old date and enter a new one or use the calendar (icon on the right side of the field).
Step 7. Save Changes
- After filling in all fields, carefully check the accuracy of the entered data.
- Click the "Save" button at the bottom of the form.
- Wait for the confirmation of saving (message about successful saving or change of button state).
Important Notes:
- All date fields must be filled in the format DD.MM.YYYY.
- Specify amounts without spaces, only numbers (for example, 1000.50).
- Carefully check the currency in each section — USD is set by default.
- If any field does not require filling, leave it empty.
- In case of errors during saving, check the correctness of the data format and internet connection.
Done! The "Logistics" form has been edited and saved.