Checklists
Managing and using personal checklists
The My Checklists section is a dedicated area for maintaining personal checklists.
Note: Access to all tools in this section is available to any user logged into the corporate portal.
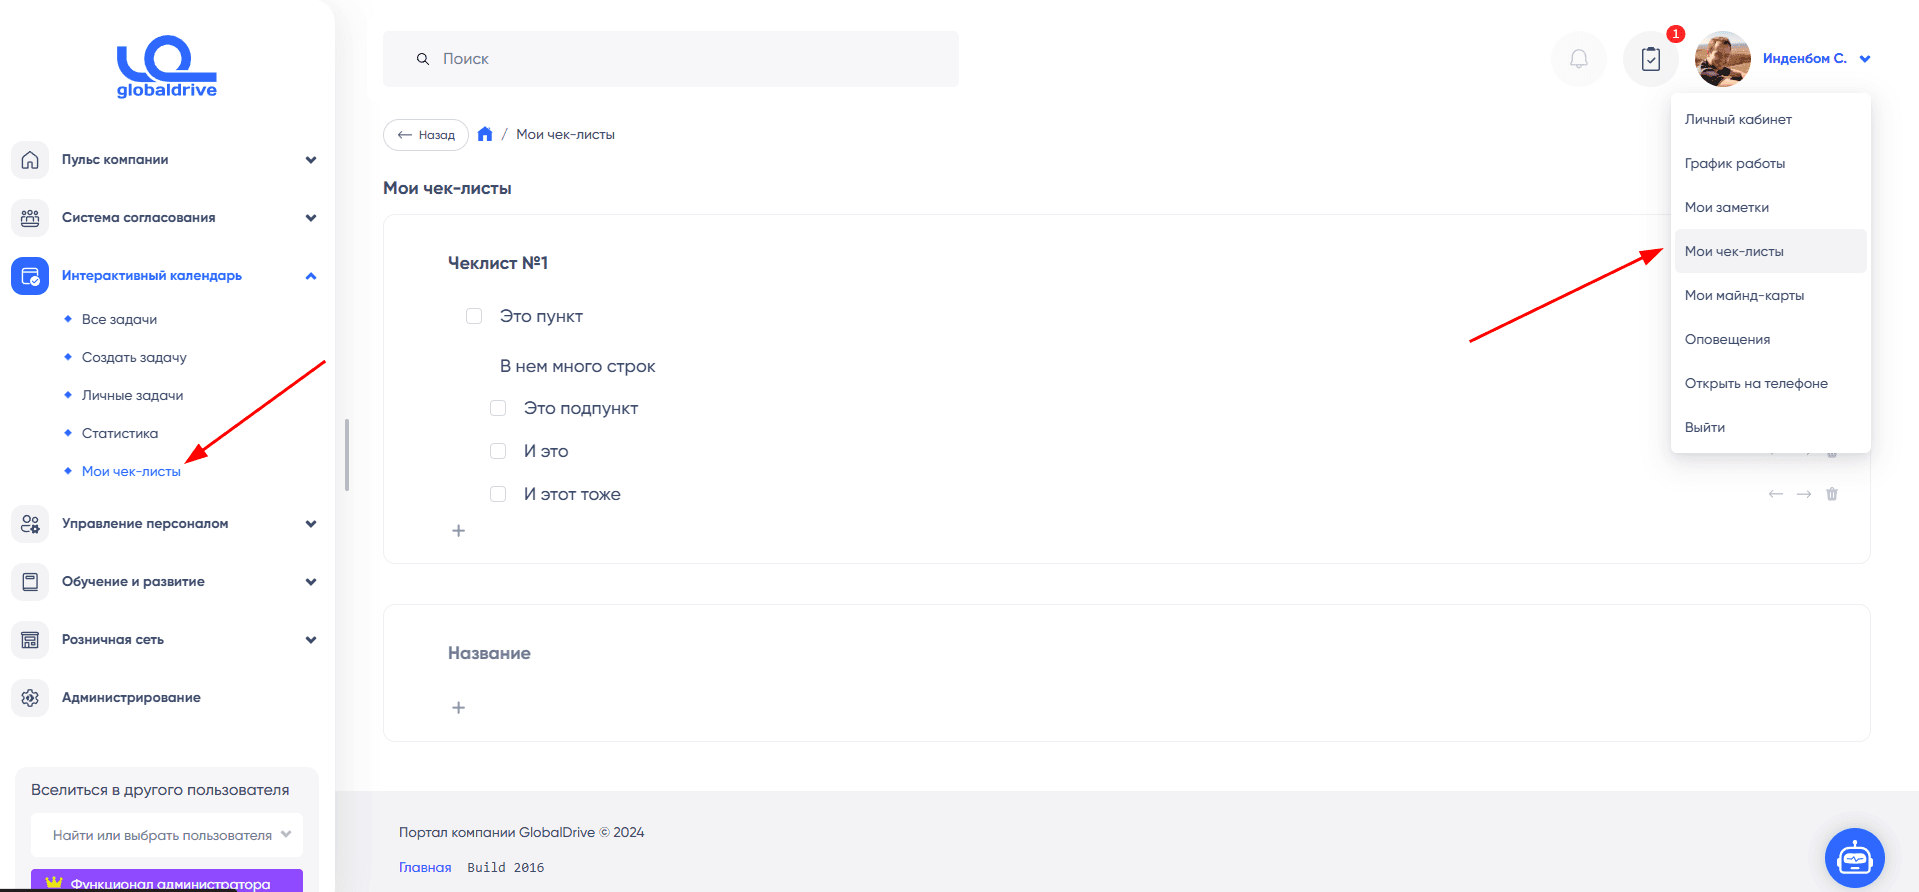
To navigate to the My Checklists workspace, go to the system menu of the corporate portal and select Tasks➔My Checklists, or in the upper right corner of the corporate portal, click on the user icon (your icon on the corporate portal), then select My Checklists.
All user checklists are displayed in the workspace of the section as a list in the order set by the user (manual sorting, i.e., the user has the ability to arbitrarily change the order of checklists in the list).
How to Create an Effective Checklist
- Define the goal ("What do I want to achieve?").
- Break it down into steps (from 3 to 15 items — more can be overwhelming).
- Avoid deep nesting of sub-items (no more than 2 levels; any "flat" text is easier to perceive, and expanding sub-items takes additional time).
- Formulate clearly ("Call the client" is better than "Contact").
- Add context (if needed: time, place, resources).
- Test on one task, adjust the structure.
- Regularly review (remove outdated items, add new ones).
Toolbar of the Section
The My Checklists section has an intuitive toolbar that allows for efficient management of the checklist lifecycle.
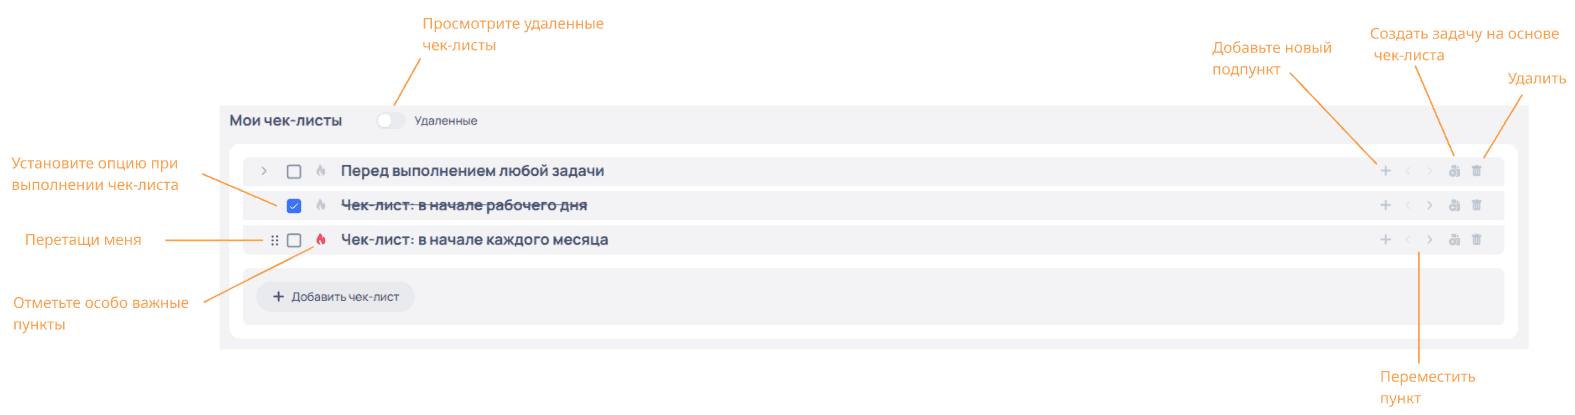
Note: Hovering over any interface icon will display a tooltip with the purpose of the selected element.
Creating a Checklist
- Go to the My Checklists section.
- In the workspace of the section, click Add Checklist.
- In the input field, enter the name of the checklist; to save the checklist name, click on any free space in the workspace of the section or add a sub-item by clicking "+" (Add Sub-item).
Note
- To create multiple checklist items at the same level of nesting, after entering the checklist name, press the Enter key. One press corresponds to one new checklist item. Press Enter as many times as necessary. To delete the newly created checklist item, press the Backspace key.
- To create multiple checklist items at the same level of nesting with a default name, simply press the Enter key. One press corresponds to one new checklist item. Press Enter as many times as necessary. To delete the newly created checklist item, press the Backspace key.
Upon successful creation, the newly created checklists will appear in the workspace of the section as a list.
Editing a Checklist
- Go to the My Checklists section.
- In the list of checklists in the section, find the desired checklist.
Note: Deleted checklists are not available for editing.
- To edit the name of the checklist, click on the name in the desired entry, then enter the new name. To save the new checklist name, click on any free space in the section.
- Edit other checklist parameters according to the description of the section's toolbar.
Note: Hovering over any interface icon will display a tooltip with the purpose of the selected element.
Upon successful editing, the checklists with the edited parameters will appear in the workspace of the section in the list of personal checklists.
Deleting Checklists
- Go to the My Checklists section.
- In the list of checklists in the section, find the desired checklist, then click on the "Trash" icon.
- To delete the checklist, click Confirm, to cancel, click Cancel.
Upon successful deletion, the deleted checklists will disappear from the list of personal checklists in the section.
Restoring a Checklist
- Go to the My Checklists section.
- In the workspace of the section, toggle the Deleted switch.
- From the list of checklists, find the desired checklist marked as Deleted, then click on the "Restore" icon.

Upon successful restoration, the restored checklist will appear in the list of checklists in the section.
Creating a Task Based on a Checklist
-
Go to the My Checklists section.
-
In the list of checklists in the section, find the desired checklist, then click on the "Create Task" icon.

The user is redirected to the Create Task form where:
- The task name corresponds to the name of the checklist item based on which the task was created.
- In the Checklists section, the checklist items are added.
-
Fill out the Create Task form according to the description in the Create Task section, and after filling out the form, click Save.
Upon successful creation of the task, the user receives a system message Task added and is redirected to the page of the newly created task, while in the workspace of the My Checklists section, the corresponding checklist displays an icon with the number of created tasks.
Note: When a checklist based on which a task was created is deleted, the checklist is retained in the corresponding task.
Quick Access from User Menu
The functionality is identical to checklists in the task tracker.
Available in the main menu and in the user menu:
Features
- Create, rename, and delete checklists
- Add, edit, and delete items
- Add items of any nesting level
- Move items by dragging
- Move items using buttons (icons on the right)
- Multi-line items are supported, line breaks are preserved
- Adapted for mobile version