Kanban
The Kanban section is a specialized part of the task tracker, representing a kanban board.
To access the task tracker from the system menu of the corporate portal, navigate to Tasks ➔ All Tasks.
A kanban board is a tool for visual project and task management. The main idea is to create a visual representation of the current status of tasks and their movement from inception to completion.
A task is the basic unit of work, representing a specific action or set of actions aimed at achieving a particular result within a project or business process.
Role of a task on the kanban board: a task on the kanban board is represented as a card that moves between columns of the board, reflecting the stages of the business process or project. In general terms, the process of moving task cards on the kanban board can be represented as follows:
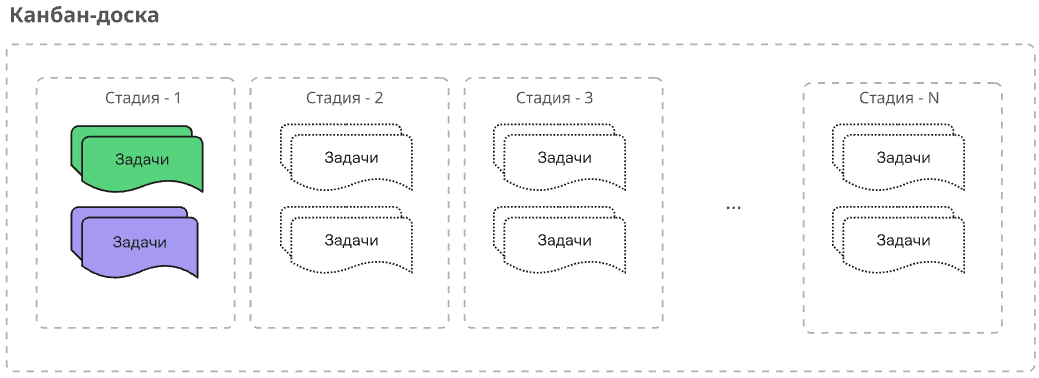
A project is a cohesive set of interrelated tasks aimed at achieving a unique result (product, service, solution) under specified conditions (timeframes, budget, resources, quality).
In work management tools (task tracker, kanban board), a project serves as a container and context for tasks, providing them with semantic coherence and targeted direction.
Role of a project on the kanban board: a project, or rather its stages on the kanban board, can be represented as columns of the board. In the movement of task cards through the stages of the project, it is not necessary for all tasks of the project to pass through all stages:
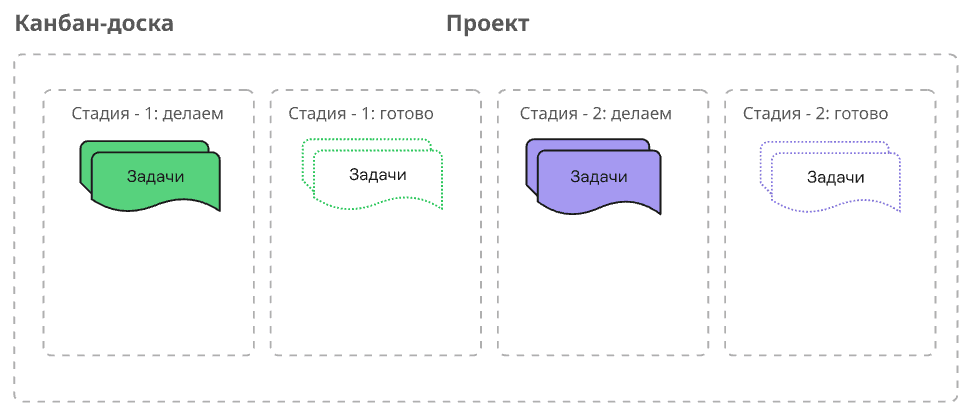
Types of tasks in the task tracker:
- Task not linked to a project, or simply a task;
- has a set of system fields, including system statuses and priorities.
System fields — a set of fields for a task that are created when filling out the task creation form in the task tracker: Task statuses or system task statuses — a pre-defined set of task statuses in the task tracker: Pending ApprovalIn ProgressPending ConfirmationCompleted In general, when performing tasks in the task tracker, all tasks go through a chain of statuses: Pending Approval ➔ In Progress ➔ Pending Confirmation ➔ Completed
- Task linked to a project (project task):
- has a set of system fields, including system statuses and priorities.
- can be grouped by project stages.
Project stages — a separate metric of projects, not related to task statuses. The set of project stages is created when the project is created and can be edited later: ToDoIn ProgressDone
- has a set of custom fields inherited from the associated project.
Attention: The set of custom fields is created when the project is created.
Managing Kanban Boards
The structure of kanban boards can vary significantly from one another, depending on the initial conditions for forming the columns of a specific board. Task cards move across the board according to the business logic of the specific process.
Enabling Kanban Board Mode
- Navigate to the All Tasks section.
- You can enable the display of tasks on the kanban board in two ways:
- In the toolbar of the All Tasks section, select Kanban from the My Tasks menu.
- In the toolbar of the All Tasks section, click the "Settings" icon:
- In the View Settings panel, click on the View entry.
- Click on Kanban.
All user tasks will be displayed on the kanban board as task cards based on the settings of the View Settings panel.
Working with Kanban Board Templates: Grouping by Statuses
- Navigate to the All Tasks section.
- Enable the task display mode on the kanban board.
- In the toolbar of the All Tasks section, click the "Settings" icon:
- In the View Settings panel, click on the Grouping entry.
- Click on the By Statuses entry.
- Right-click on the empty space to hide the View Settings panel.
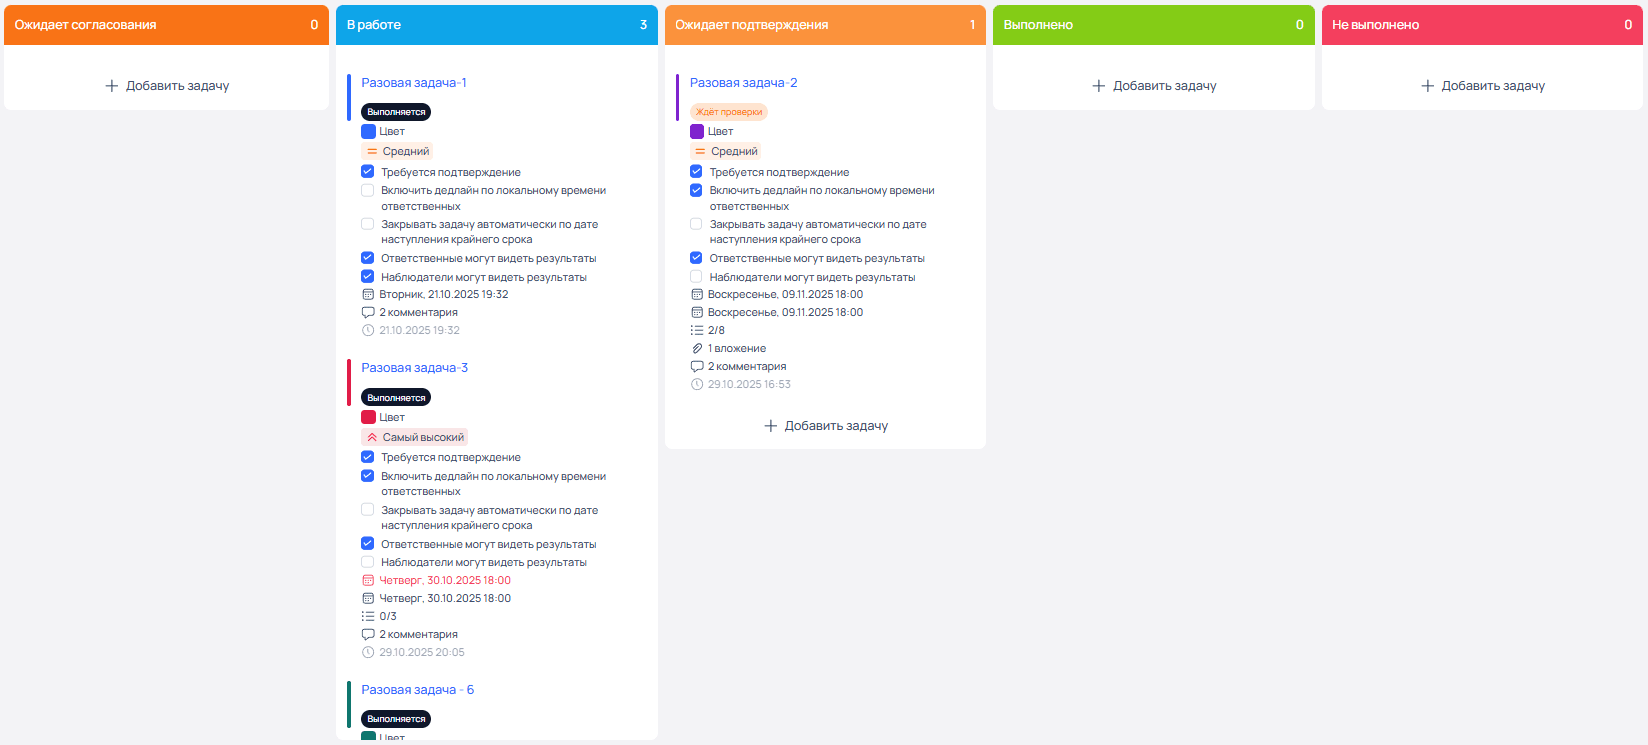
The working area will display a kanban board template:
- with column names corresponding to the names of system task statuses in the task tracker;
- showing the number of tasks in each column.
All user tasks will be distributed across the board columns according to the current task statuses in the task tracker.
Example of grouping tasks by statuses
Working with Kanban Board Templates: Grouping by Priorities
- Navigate to the All Tasks section.
- Enable the task display mode on the kanban board.
- In the toolbar of the All Tasks section, click the "Settings" icon:
- In the View Settings panel, click on the Grouping entry.
- Click on the By Priorities entry.
- Right-click on the empty space to hide the View Settings panel.
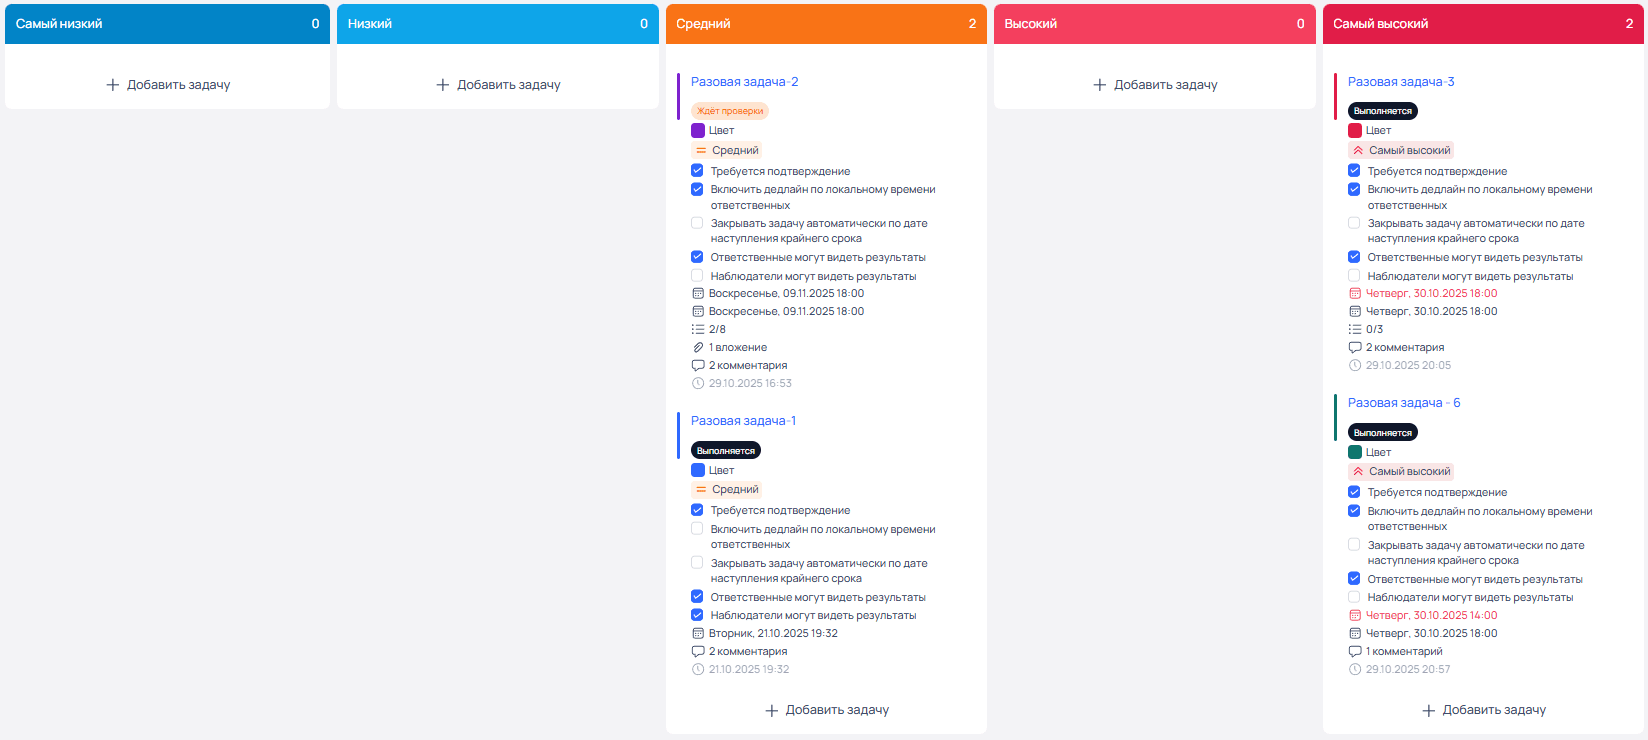
The working area will display a kanban board template:
- with column names corresponding to the names of existing priorities in the task tracker;
- showing the number of tasks in each column.
All user tasks will be distributed across the board columns according to the current task priorities in the task tracker.
Example of grouping tasks by priorities
Working with Kanban Board Templates: Grouping by Due Date
- Navigate to the All Tasks section.
- Enable the task display mode on the kanban board.
- In the toolbar of the All Tasks section, click the "Settings" icon:
- In the View Settings panel, click on the Grouping entry.
- Click on the By Due Date entry.
- Right-click on the empty space to hide the View Settings panel.
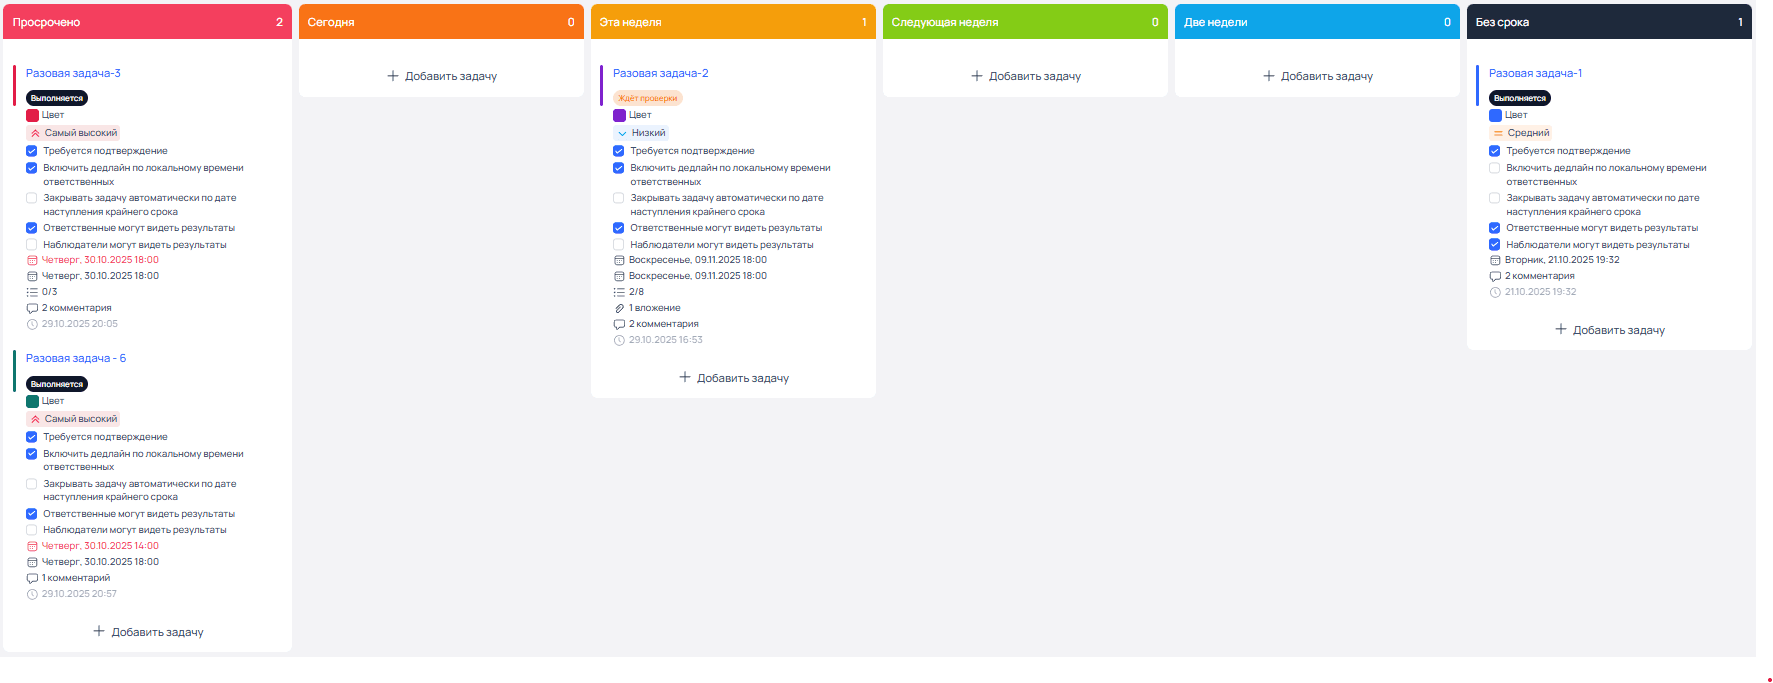
The working area will display a kanban board template:
- with column names:
- Overdue
- Today
- This Week
- Next Week
- Two Weeks
- No Due Date
- showing the number of tasks in each column.
All user tasks will be distributed across the board columns according to the current due dates of tasks in the task tracker.
Example of grouping tasks by due date
Working with Kanban Board Templates: Grouping by Stages
- Navigate to the All Tasks section.
- Enable the task display mode on the kanban board.
- In the toolbar of the All Tasks section, click the "Settings" icon:
- In the View Settings panel, click on the Grouping entry.
- Click on the By Stages entry.
- Right-click on the empty space to hide the View Settings panel.
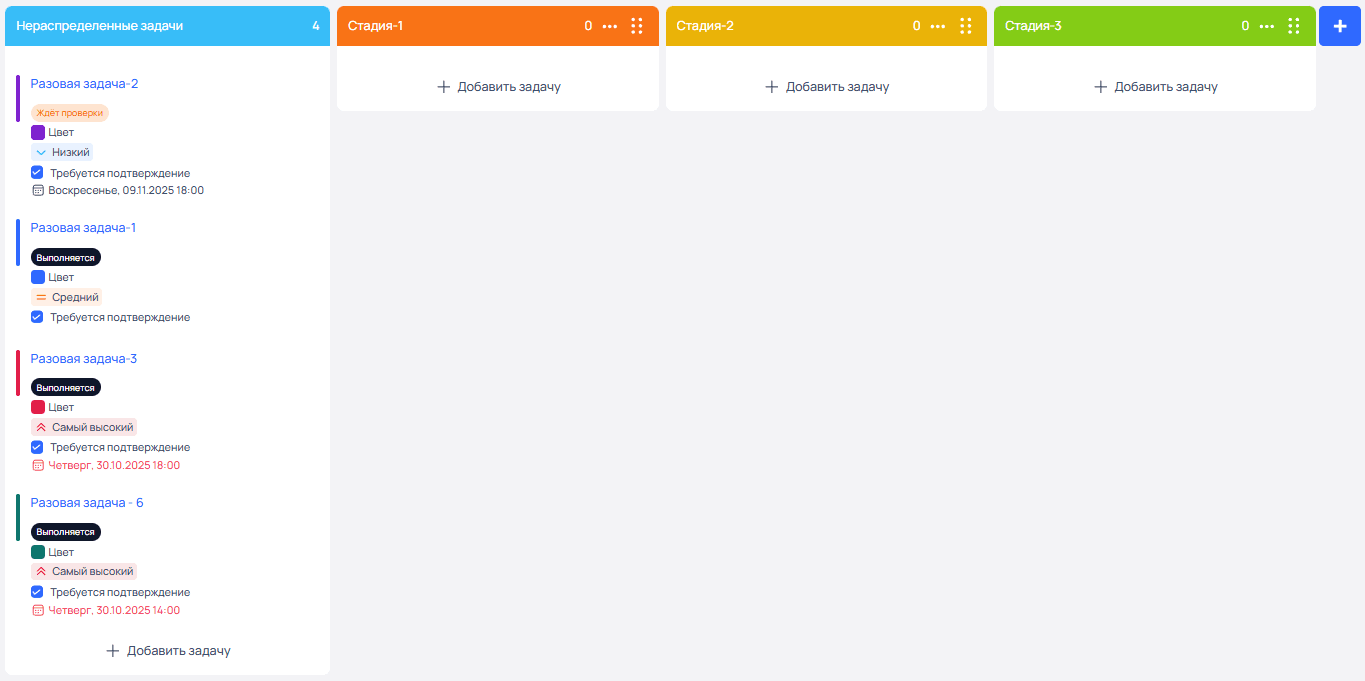
The working area will display a kanban board template. All user tasks will be distributed across the board columns, indicating the number of tasks for each column.
Attention: This board mode allows:
- Creating, editing, and deleting kanban board columns while viewing individual tasks (the My Tasks grouping is enabled in the toolbar of the All Tasks section). The user can create their own board with their unique logic. By default, all user tasks will be distributed in one column Unassigned Tasks.
- Creating, editing, and deleting project stages while viewing tasks grouped by projects (the grouping by a specific project is enabled in the toolbar of the All Tasks section). By default, all user tasks will be distributed among the system project stages:
- ToDo;
- In Progress;
- Done.
Example of a kanban board with custom columns while viewing tasks
Creating Stages
Creating a new stage is an effective task management tool. Any user can form an individual set of stages.
- Navigate to the All Tasks section.
- In the toolbar of the All Tasks section, enable the My Tasks grouping or enable grouping by a specific project.
- In the View Settings panel, click on the Grouping entry:
- Click By Stages.
- On the kanban board to create a new stage, click the “+” to the right of the header of the last column or hover the cursor to the left or right of the header of existing columns, then click “+”.
- In the New Stage window, fill in the necessary data:
- Input field Name: defines the name of the newly created stage. Enter the name of the new stage.
- Select Color: allows you to choose the color of the stage. To open the additional color panel, click “+”. Click on the desired color.
- Click Save to cancel, click Back.
- In the New Stage window, fill in the necessary data:
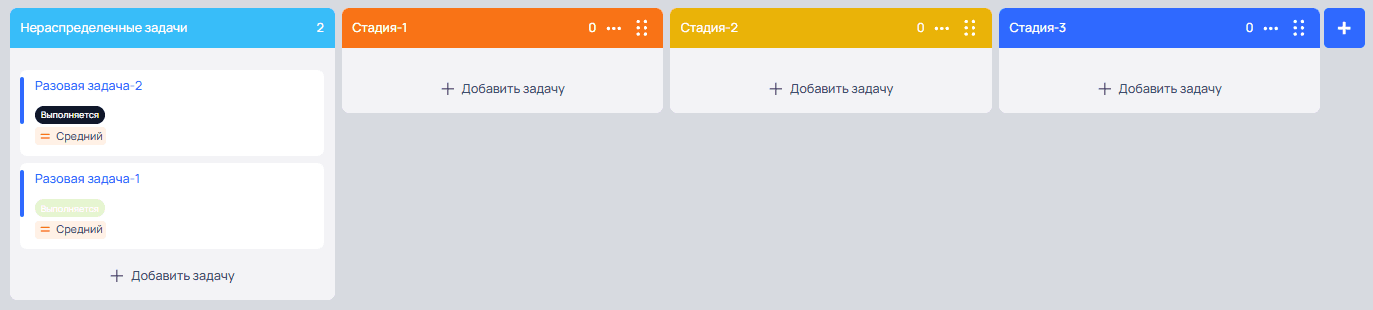
Upon successful creation, the newly created stage will be displayed as a new column on the kanban board.
Examples of displaying tasks on the kanban board grouped by stages
Editing Stages
- Navigate to the All Tasks section.
- In the toolbar of the All Tasks section, enable the My Tasks grouping or enable grouping by a specific project.
- In the View Settings panel, click on the Grouping entry:
- Click By Stages.
- To edit the parameters of a stage, click “...” on the header of the corresponding column, then click Edit:
- In the Stage Settings window, edit the necessary data:
- Input field Name: defines the name of the newly created stage. Edit the name of the stage.
- Select Color: allows you to choose the color of the stage. To open the additional color panel, click “+”. Edit the color of the stage.
- Click Save to cancel, click Back.
- In the Stage Settings window, edit the necessary data:
- To change the position of the kanban board column (stage), drag the corresponding column by the drag handle to the desired location.
Upon successful editing, the edited stage will be displayed as a column on the kanban board with the new parameters.
Deleting Stages
- Navigate to the All Tasks section.
- In the toolbar of the All Tasks section, enable the My Tasks grouping or enable grouping by a specific project.
- In the View Settings panel, click on the Grouping entry:
- Click By Stages.
- To delete the parameters of a stage, click “...” on the header of the corresponding column, then click Delete.
Upon successful deletion, the column will disappear from the display, and a system message will appear in the working area of the section: Stage deleted.
Managing Tasks on the Kanban Board
On the kanban board, a task is represented as a card that moves between columns reflecting the stages of the workflow.
Task management on the kanban board focuses on the visual representation of the task flow. The movement of task cards between columns is done manually.
Moving Tasks Between Columns
- Navigate to the All Tasks section.
- Select the desired board template.
- "Grab" the card with the mouse (or finger on a touchscreen).
- Move the card from the current column to the target column.
- Release the card: the card is fixed in the new column.
Upon successful movement, the card will be displayed in the target column of the board, and the task history will reflect the change in the current task status depending on the selected kanban board template.
Configuring the Display of System Fields in the Task Card
The View Settings panel allows detailed configuration of the display of task cards on the kanban board.
Attention: In task cards not linked to a project, only system fields can be configured for display.
- Navigate to the All Tasks section.
- In the section menu, click the "Settings" icon.
- In the View Settings panel:
- View: when displaying tasks on the kanban board, it is important —
Kanban. Click on the entry and selectKanbanif you have not previously switched to kanban board mode, then return to the View Settings panel. - Property Visibility (System fields) allows you to configure the display of system fields in the task card:
- View: when displaying tasks on the kanban board, it is important —
- In the View Settings panel:
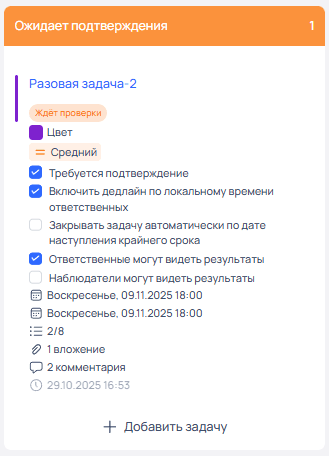
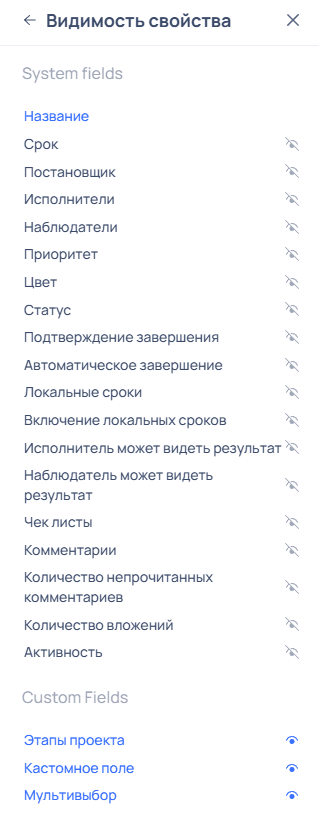
System fields are created at the task creation stage: Visible properties are highlighted in blue, and next to each property, there is a visibility icon "open eye". Hidden properties are highlighted in dark blue, and next to each property, there is a visibility icon "closed eye". To change the state of properties Visible/Hidden, click on the visibility icon.
- Name: the name of the task is always displayed.
- Due Dates: allows you to configure the display of the task's due date. Set the desired property state.
- Assignee: allows you to configure the display of the task assignee. Set the desired property state.
- Performers: allows you to configure the display of task performers. Set the desired property state.
- Observers: allows you to configure the display of task observers. Set the desired property state.
- Priority: allows you to configure the display of task priority. Set the desired property state.
- Color: allows you to configure the display of the task color. Set the desired property state.
- Status: allows you to configure the display of the task status. Set the desired property state.
Attention: Task statuses are not related to the stages of the kanban board, except in the case of grouping tasks by statuses.
- Completion Confirmation: allows you to configure the display of the task completion confirmation option. Set the desired property state.
- Automatic Completion: allows you to configure the display of the automatic task completion option by the due date. Set the desired property state.
- Local Due Dates: allows you to configure the display of the due date in the local time of the responsible parties. Set the desired property state.
- Enable Local Due Dates: allows you to configure the display of the option to include the deadline in the local time of the responsible parties. Set the desired property state.
- Performer Can See Result: allows you to configure the display of the option for responsible parties to see results. Set the desired property state.
- Observer Can See Result: allows you to configure the display of the option for observers to see results. Set the desired property state.
- Checklists: allows you to configure the display of the presence of checklists in the task and completed items from existing ones. Set the desired property state.
- Comment: allows you to configure the display of the presence of comments, the number of comments. Set the desired property state.
- Number of Unread Comments: allows you to configure the display of the presence of unread comments, the number of comments. Set the desired property state.
- Number of Attachments: allows you to configure the display of the presence of attached files and their quantity. Set the desired property state.
- Activity: allows you to configure the display of the time of the last change in the task. Set the desired property state.
Example of displaying system fields in the task card
Configuring the Display of Custom Fields in the Task Card
The View Settings panel allows detailed configuration of the display of task cards on the kanban board.
Attention: Configuring the display of custom fields is available in tasks linked to projects.
- Navigate to the All Tasks section.
- In the working area of the section, group tasks by the desired project and enable kanban mode.
- Set the desired kanban board template.
- In the section menu on the toolbar, click the "Settings" icon.
- In the View Settings panel:
- Property Visibility (Custom Fields) allows you to configure the display of custom fields in the task card.
- In the View Settings panel:
Custom fields are created at the project creation stage: Visible properties are highlighted in blue, and next to each property, there is a visibility icon "open eye". Hidden properties are highlighted in dark blue, and next to each property, there is a visibility icon "closed eye". To change the state of properties Visible/Hidden, click on the visibility icon.
- Set the desired display state for custom fields.
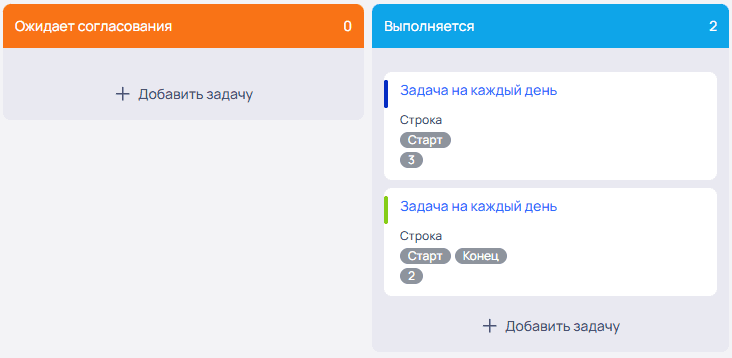
Example of displaying custom fields in the task card
Creating a Task on the Kanban Board
- Navigate to the All Tasks section.
- Select the desired board template.
- In the selected column of the kanban board, click + Add Task.
- To refresh the board, click on an empty space in the working area of the All Tasks section.
Upon successful creation, the newly created task will be displayed in the selected column of the kanban board, and a message will appear in the working area of the section: Task created.
Editing a Task on the Kanban Board
- Navigate to the All Tasks section.
- Select the desired board template.
- Click the "Pencil" icon on the desired task.
- Edit the task name and other visible fields by simply clicking on the field you want to edit and entering the necessary data.
Attention: Changes are saved automatically, and a system message will appear in the working area of the screen: Task saved.
-
To call the task editing form on the desired card, click the “...” icon, then click edit:
- Edit the necessary fields of the task, then click Save.
Upon successful editing, the edited task will be displayed in the selected column of the kanban board with the new parameters, and a message will appear in the working area of the section:
Task updated. -
To move the task card up or down on the desired card, click the “...” icon, then select the desired action:
- Move Up
- Move Higher
- Move Lower
- Move Down
Upon successful movement, the moved task will be displayed in the desired location of the column, and a message will appear in the working area of the section:
Task moved.
Creating a Copy of a Task on the Kanban Board
- Navigate to the All Tasks section.
- Select the desired board template.
- Click the “...” icon on the desired card, then click Create Copy.
- Fill out the Create Task form, then click Save.
Upon successful creation of the copy, you will be redirected to the created task form, and a message will appear in the working area of the section: Task added.
The newly created task will be displayed in the corresponding column of the kanban board.
Deleting a Task
- Navigate to the All Tasks section.
- Select the desired board template.
- Click the “...” icon on the desired card, then click Delete.
- To confirm deletion, click Yes, to cancel, click No.
Upon successful operation, the deleted task will disappear from the kanban board, and a message will appear in the working area of the section: Task deleted.