Creating and Editing a Template
The Templates section is a special section of the task tracker designed for creating templates.
A template is a special type of task that cannot be taken into work but can be used to create tasks in the task tracker manually and on a schedule.
Attention: The main difference between a template and a task is that a template cannot be taken into work.
A task based on a template can be created both manually and on a schedule.
To navigate to the workspace of the Templates section in the corporate portal's system menu, go to Tasks ➔ Templates.
In the workspace of the section, all user templates are displayed as a list.
Structure of the Template List
| Field Name | Description |
|---|---|
| # | Template identifier in the task tracker |
| Name | Template name |
| Deadline | Deadline relative to the time of task creation based on the template. For example: 1 day Attention: The time interval after which the deadline for the task created based on the corresponding template will be calculated. |
| Responsible | Users responsible for completing the task created based on the specified template (by default — the author of the template) |
| Assignee | User responsible for assigning the task created based on the specified template (by default — the author of the template). |
Creating a Template
- To create a new template, go to the Templates section.
- In the workspace of the Templates section, click Add Task Template.
- Fill out the Create Task Template form based on the description of the Create Task form in the section Creating and Editing a Task.
Attention: When specifying another user as the assignee, the author of the template is automatically added as an observer of the task, and a system message is displayed in the workspace: You have been automatically added as an observer.
- Unlike a regular task, there are several additional settings:
- Deadline: how many days/hours/minutes after the creation of the task based on the template the deadline (due date) of the newly created task will occur.
- Repeat Task section (set the option Make Task Regular):
- Frequency section:
- Day (every day):
- Interval in days between tasks (default — every day).
- Week:
- Interval in weeks (default — every week).
- Day on which the task is created (optional).
- For example, you can set the task to be created every day from Monday to Friday.
- Month:
- Repeat on (optional): you can select a date on which the task will be created and an interval in months (default — every month).
- Repeat every (optional): you can select a day of the week on which the task will be created and an interval in months (default — every month).
- Year:
- Repeat every year (optional): you can select a day and month.
- Repeat every (optional): you can select a day of the week and month.
- Day (every day):
- Start section:
- Task Creation Time: set the time.
- Start Repetition: set the start date for the template's action.
- End section:
- No End Date (optional).
- End Date (optional): set the end date for the template.
- Finish After (optional): set the number of repetitions.
- Frequency section:
- After filling out the template creation form, click Save.
Upon successful creation of the template, the user will be redirected to the task template view page, and a system message Task Added will be displayed in the workspace of the section.
Attention: The task created based on the template will appear in the user's task list according to the specified schedule.
Viewing the Template Page
The template view page displays detailed information about the template: description, assignee, responsible users, observers, creation date, and other useful information.
To navigate to the template page:
- Go to the Templates section.
- In the template list, click on the entry for the selected template.
The user will be redirected to the template page with detailed information about the template:
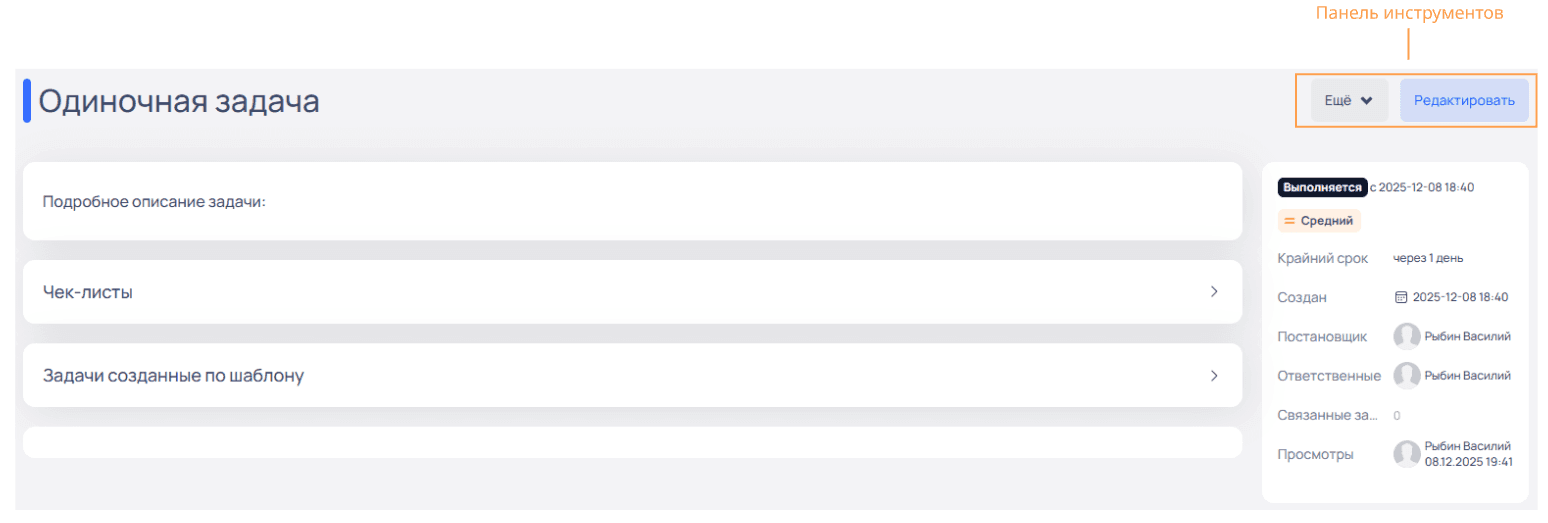
- Template name and default template color.
- Template description.
- Checklists section.
- Tasks Created from Template section: contains a list of tasks created based on the specified template, with task information:
Attention: From this section, you can navigate to the task page. To go to the task page, click on the desired task entry in the list.
- ID — task identifier in the task tracker.
- Task Name — name of the task in the task tracker.
- Status — current status of the task in the task tracker.
- Created — date the task was created based on the template.
- On the right side, a section with detailed description of the template:
- Template status with the time of template creation.
- Priority (default —
Medium). - Deadline: time interval for calculating the deadline for the task created based on this template.
- Created: time of template creation.
- Assignee (default — the author of the template).
- Responsible (default — the author of the template).
- Related Tasks (default —
0). - Views: last users who viewed the template.
Editing a Template
- Go to the Templates section.
- In the template list, click on the entry for the selected template.
- On the template page, click Edit.
- In the Edit Task Template form, edit the necessary data. The form fields correspond to the description of the Create Task form in the section Creating and Editing a Task and the section Creating a Template in the context of additional settings description.
- After entering the data, click Save.
Upon successful editing of the template, the user will be redirected to the edited template page, and a system message Task Updated will be displayed in the workspace of the section.
Creating a Task from a Template
- Go to the Templates section.
- In the template list, click on the template from which you need to create a task.
Attention: Tasks based on templates with a specified schedule are created automatically. On the template view page, on the right side in the section with detailed description of the template, the next creation date for the task from the template according to the schedule is indicated. When hovering over the values of the fields with the template description in the workspace of the section, tooltips are displayed.
- On the template view page, in the More menu, click Create Task from this Template.
- Fill out the Create Task form based on the description in the section Creating and Editing a Task.
- After entering the data, click Save.
Upon successful creation of a task based on the template, the user will be redirected to the task page, and a system message Task Added will be displayed in the workspace of the section.